IRC Guide: mIRC
IRC Guide
Internet Relay Chat lets people all over the world participate in real-time conversations. This guide will explain how to configure and use IRC’s most popular client- mIRC- to connect to the European gaming network known as Quakenet.
- Go to http://www.mirc.com/irc.html and download and install the latest version of mIRC.
- Run mIRC and click “Continue”. You will be shown the Options screen. Fill in your full name, e-mail address (this doesn’t have to be a real address), nickname and alternative nickname. See Image 1 as an example.

Image 1- Connect info.
- From the Category tab on the left side of the Options screen, select “Servers” (under the expanded “Connect”). Under the IRC Networks drop-down menu, select “Quakenet”. Under the IRC Server drop-down menu, select a server close to you. Image 2 shows the server choice for a UK user.

Image 2- Servers info.
- From the Category tab on the left side of the Options screen, select “Options” (under the expanded “Connect”). Check the “Connect on startup” box. Click “OK” to close the mIRC Options window. Click the connect button, highlighted on Image 3.

Image 3- connect button highlighted in red.
- Wait a while to connect to Quakenet. Soon, you will be presented with the Favourites box. This is defaulted to show irrelevant channels (A channel is a named “room” that allows people in the channel to chat to one another). Select the top channel (#AllNightCafe), then scroll to the bottom of the list, hold shift and click the last channel (#Worldchat). You should now be selecting all the channels. Click delete to remove them. Uncheck the “Pop up favorites on connect” box. Image 4 shows what your “favorites” box should now look like.

Image 4- a blank Favourites window.
- We will now add channels that we wish to visit. Select “Add”. We need to add in the relevant channel information. As an example, we shall add the European NS league channel. The channel is “#ensl” (all channels start with a hash); there is no password as it is a public channel. Add a description if you want- this is optional. From the “Networks” drop-down menu select “Quakenet” (this tells mIRC that we only wish to join this channel if we are on the Quakenet server). For easy access, check the “Join on connect” box. Your screen should match that of Image 5.

Image 5- adding a channel.
- Click “OK” and repeat step 6 for other channels you wish to join.
- Double click a channel from the “Favorites” window to join it. For now- double click #ensl. You should see something similar to Image 6.
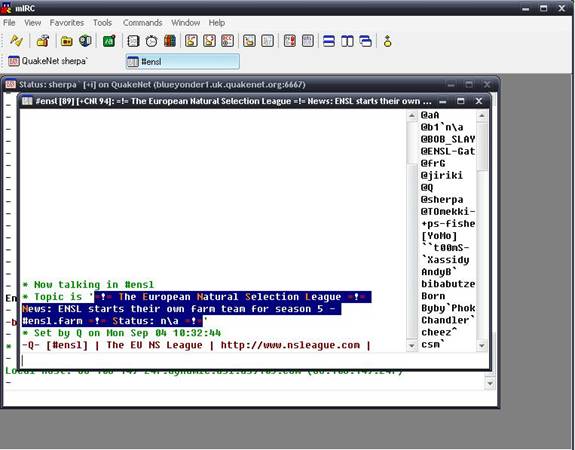
Image 6- joined a channel.
- You have now connected to a Quakenet channel. Type messages in the text bar and pres enter to send it to the channel. Notice the nickname list on the right side of the window. Those with an “@” before their name are known as operators (aka “ops”). They are admins of the channel, and can kick or ban people, and change topics. Those with a “+” before their name are voiced. This is mostly used as recognition; though if a channel is moderated (displayed by the channel’s window having a “+m” in it- not shown inscreenshot) then only people who are ops and voiced can chat.
- As nickname cannot be registered and some IPs are dynamic, we need to create a unique Quakenet account so that the server knows who we are. (Make sure your nicknames does not have any special characters in it. If it does- change it with the “/nick [new name]” command”). In the chat panel, type “/msg Q hello [real e-mail address] [real e-mail address]”.
- Example: /msg Q hello
- Go to your inbox, open the e-mail from Q (check your spam filter if needs be) and click the link to activate your account. Take note of the information given.
- We now have our account name and password. We have to give this information to Quakenet every time we log on to authenticate. Thankfully- mIRC has an option to do this for us automatically. Select the “Options” button- highlighted on image 7.
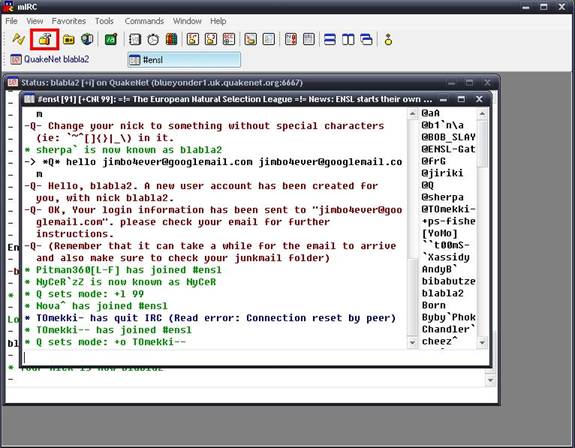
Image 7- options button.
- From the Category tab on the left side of the Options screen, select “Options” (under the expanded “Connect”). Click “Perform…”. Check “Enable perform on connect”. Select Quakenet from the “Add” button next to the “Network” drop-down menu. In the “Perform commands” text box, enter /msg Q@CServe.quakenet.org AUTH [username] [password] (Image 8)
- Example: /msg Q@CServe.quakenet.org AUTH sherpa Q45+au
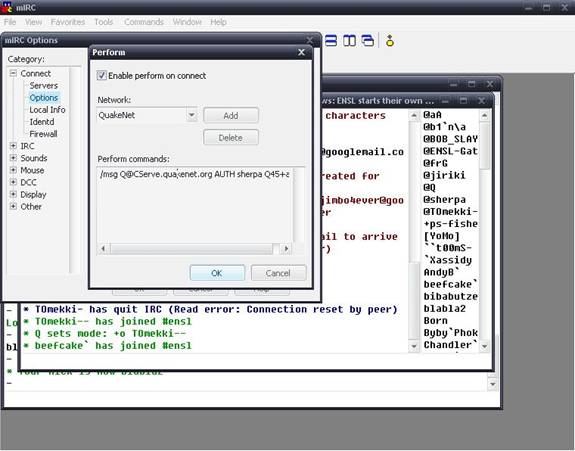
Image 8- performing Quakenet auth.
- Select “OK” in Perform and Options. Restart mIRC and you should automatically connect to Quakenet, log in to your account and join your channels.
Date: 06/09/2006
Source: ENSL
Written by: sherpa
Comments
New Comment
Please log in or register to post comments.